thehorseswhinny.com
  • HOME
  • ABOUT
  • BITS OF WISDOM
  • CONTACT

Good Hands II

7/19/2023

0 Comments

 
Picture
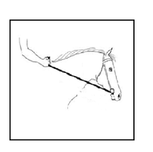
     Here are some more tips on correct hand position.  While it may seem like a lot of things to think about, it does make a difference.  The difficulty in using reins to steer a horse is the fact that they have so much play in them.
     If you think of an auto's wheel, or a bicycle's handlebars, they are solid and there is no play.  When I was a kid, I had a bike with streamers coming out of the grips on the handlebar.  I would try to steer with the streamers, pretending they were reins.  It was very difficult.  So, the precision with which you hold the reins makes your steering and communication with the horse that much more accurate.
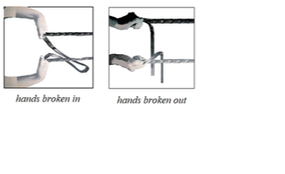
      There is a problem with hands breaking in or out.  This creates a weakness in the arm and connection.  Hands broken out tend to   encourage the "duckwing" position of the elbows mentioned earlier.  Hands broken in can also cause elbows to stick out but more likely cause tenseness, as if the rider is trying too hard.

0 Comments

Good Hands I

7/17/2023

0 Comments

 
Picture
      Good hands are one of the most important aspects of good riding.  It is probably one of the most difficult to learn and to teach. The most important part of learning good hands is that you are sympathetic to the horse.  This means that you must train yourself to keep your hands in such a way that they don't pull on the horse's mouth or give him mixed signals.
     When you think of the bit, think of it sitting on the bars of the horse's mouth.  The bars are an open space of his gums between his incisors and molars.  So, just imagine a heavy piece of metal banging on your gums and I think that would make you careful.
     To make your hands able to not pull, or accidently jerk the reins, takes lots of practice.  All of my beginner students start on a lunge line, and don't get to hold the reins until they develop enough balance to do so.  This is finding your seat.  I was taught this way.  (With no saddle to boot!)
     Once you are balanced enough to hold the reins "independently" you can learn about contact.  Often, beginners are taught to ride on a loose rein at first.  This is OK too, if you have a trusty school horse.  But eventually we must learn contact.  Contact with the horse's mouth means a gentle feel through the reins.  It has often been described as "elastic".  It should be consistent.  So, how long or short are the reins?  Well, your hands should be well in front of the pommel of the saddle.  If they are too long, your hands will end up in your tummy and have nowhere to go.  Too short may cause you to tip forward.  But the shorter the rein, the more control.  In jumping, or Hunt Seat, you are forward, so therefore the reins are naturally shorter.
     How high or low do you carry your hands? A simple rule.  There should be a straight line from your elbow to the horse's mouth.  That takes the guesswork out.  Your hands should be fairly close together, but not touching.  One on each side of the neck.  Elbows should be at your side, hanging relaxed, not out like duck wings. 
      So when the horse walks, there is movement to his head.  You must follow this movement with your hands.  The movement is allowed in your elbows.  The elbows open and close, but still stay brushing youur sides.  In canter you must follow also - it is even a bigger motion than walk.  Interestingly, gallop has less forward and back than canter.  Jumping has one VERY big follow over the fence, but that is another subject. The really hard one is trot.  There is no head movement to follow, but if you are posting you are moving.  So how do you keep the hands quiet in trot?
     This also takes practice.  The best way I have found is to practice on the lunge line.  Or, if you are riding and have enough control you can practice anytime.  Simply put your pinky fingers, or even your knuckles on the horse's withers and try posting without the hands moving.  This may break you straight line to the bit, but that's OK for this purpose.  To keep your hands still, you must allow the elbows to open and close.  So if you are posting, when in up position, arms are straight.  When in sit position, elbows are bent.  Do not become tense.  Just let gravity keep the hands down.  They should just "lay" on the withers.  You can even practice this at the kitchen table!  So sit trot?  A little faster and bouncier.  You must work at having a good seat for sit trot first, and then the same excercise can apply. 
         
​            SEE THE SLIDE SHOW BELOW TO SEE HOW ELBOWS OPEN AND CLOSE


More on Good Hands to come....
    

0 Comments

July 02nd, 2023

7/2/2023

1 Comment

 
1 Comment

No Strings Attached

6/28/2023

0 Comments

 
Picture
0 Comments

Understanding the Canter

5/3/2023

2 Comments

 
Picture

     Cantering on a horse is probably one of the most enjoyable things we can do in riding.  Faster than a trot, but not as fast as a gallop, it is ground covering and has an almost mesmerizing rocking motion.  It is surprising how many people don't know the way a horse canters.
     As an instructor, it is obviously important that I know such things, and I believe I do. Besides taking lessons for many years, I have also read volumes and observed horses cantering on the lunge and being ridden. Not to mention schooling horses under saddle.
     First, to separate canter from the other gaits, I will explain the gaits.  The walk is four beats, the trot is two beats and works on diagonal pairs. The trot pace, is a unique unnatural gait that works on leg pairs of the same side.  The canter is three beats and the gallop is four.  So, what is the difference between canter and gallop?  They are almost the same.  Obviously the gallop is faster than a canter.  It is the fastest gait.  But the technical difference is that, well, I'll describe canter first.
     The canter haas three beats.  It is asymmetrical, unlike walk or trot.  The first footfall of the canter depends on which direction you are going.  So for example if you are going to the right, you would be said to be on the "right lead".  The horse would be bent right and turning right.  But here is where most people get confused.  The leg that begins the right lead canter and strikes off, is the left hind.  That is the first beat.  The second beat is the right hind and left front together, just like a trot diagonal.  Then the final third beat is the right front.  After the right front touches down, the horse is airborne briefly.  This is known as "the moment of suspension"  After this suspension, the sequence repeats. (See Slideshow)
     So what makes the gallop different?  Because of the speed the second beat where two legs would land together like a trot diagonal split.  So for a right lead gallop the sequence would be left hind, right hind, left fore and then the right leading leg.
      Because the horse must begin, or strike off with his outside hind to canter in the desired direction, the aid for the rider is their outside leg, either a nudge, pressure or a kick.  Usually the outside leg is brought back a little or more depending on the horse's training and rider's skill.  If you are riding a turn or circle, the outside leg should be a little back anyway.  These are nuances for skilled riders.  For a green horse or rider sometimes a good kick with the outside leg back is needed.  It all depends on horse and rider.  Horses can also learn a voice cue.  The inside leg of the rider remains active at the girth to keep the horse forward.
     Horses make mistakes in canter.  Sometimes they get a wrong lead, even if asked correctly.  They can also canter correctly with hind legs, but have the front legs going the opposite way!  This is called cross cantering or disunited canter.  I have also seen horses canter with one pair of legs and trot with the other.  All of these problems are due to the horse's imbalance.  This is where dressage traiing helps to balance the horse.  An injury could cause a horse to favor a certain lead, or not obtain the correct one at all.  Usually when riding, the rider can tell that one lead is easier tha the other - again, depends on the horse's degree of training and balance.
     Changing leads is another challenge to the horse and rider, but can be fun.  The easiest way to change a lead is to just bring the horse back to trot or walk and then give the correct cue for the new lead.  This can even be done from a halt! i.e. canter left, halt, canter right.  These are called "simple" changes.  More difficult is to change the lead without changing gait.  The horse makes the switch, on cue, during the moment of suspension.  This is called a "flying" change.  Horses can, and often do this naturally of their own will when at liberty, but is harder to get correct on cue when ridden.  To switch leads after so many strides ie. two strides, four strides, or even every stride are called "tempi" changes.  This is mostly seen in higher level dressage tests.  What fun, and so beautiful to watch, like dancing!
     So there you have it from the most basic to the most sublime.  Who doesn't love to canter?
     

2 Comments

CHANGE OF REIN

10/21/2022

1 Comment

 
Picture
​     I love horses. I love riding horses, and I love to teach riding. I have had many students over a career of some 30 years. I taught children and adults, beginners and some with experience. I taught boys and girls, men and women, though it seems the girls are more interested than the boys, of any age.
     I had a lot of different types of students; some were quick to catch on some not so. Some I became friends with and am still friends with to this day. Some rode with me for years, some just a few times or a few weeks. I taught mostly one on one, but also had opportunities to teach groups. There is a difference. 
     Since I was used to teaching one on one, when I started teaching groups for an established farm, I found it difficult to actually teach them anything since all they did was go around the edge of the arena, which in vernacular terms is going “whole school”. While I could correct things like their seat, or their hand position,
I could not really get into steering the horse, which is the hardest and very important part of good riding.
     I was used to 20 meter circles, half turns, and all sorts of school figures. But, with groups, this is hard to do. In one class, there was a horse who would not come away from the rail at all, because he was so used to sticking with it! The outside of the ring would develop a deep rut, until it was dragged level again with a tractor and a drag.
     So, I decided to get creative and find a way to teach steering. I had the group (usually about four riders) go across the diagonal of the arena.  At least they could turn away from the rail, and not be in each other’s way. So, I would give the command, “Go across the diagonal from H to F, and change rein at X. I would add change rein, because in the past, students had gone across the diagonal and not changed direction, which in riding terms is what change rein means.  So they would end up at the end of the diagonal line making a sharp, sharp turn to go the same way. Some actually knew they were supposed to change direction but somehow, got lost. 
 
     In one of my classes, with adults, I went about the business of changing direction across the diagonal.  It came to my attention, that each one of them upon crossing X, would “flip” their reins across the horse’s withers. At first I thought it was just a fluke.  I thought the reins had become tangled in the horse’s mane, or maybe it was just more comfortable. Then I noticed they were all doing it. Right at X. I thought, maybe they thought the reins had to be on a certain side, depending on direction. Then I thought, no, this was too deliberate and on the spot. I decided I had to ask.
     “Ok”, I said. What is with all the flipping and the flipping?” One of the students spoke up and replied, “Well, you said to change rein at X”. Mystery solved. I explained how the change of rein simply meant change of direction, and you always did this in the very center of any riding figure. Of course, the diagonal line is straight and the turn doesn’t occur until the rail. However, the change of direction still takes place at X, where your aids change also. For example, if you were posting the trot, you would change your trotting diagonal at X, not the rail.
You would have a new inside and outside rein, hence the change of rein.
     They all seemed to understand this, and the flipping stopped. Plus, I think they learned something new, and a subtle part of steering. But I must say, they were very obedient about the changing at X.

1 Comment

THE FIRST STEP

10/19/2022

0 Comments

 
     When you are first learning to ride, one of the basics is your position.  While this may seem trivial in some circles, it is the cornerstone of not just good riding, but safe riding.  I never realized this myself until I spent a lot of time in the saddle, and also in the end, teaching.
 

     When teaching someone to ride, once they are in the saddle I would begin with “position”, beginning with the feet and working up to the head. Of course starting at the bottom makes sense, after all, that’s the base.
 
    So, if you begin with feet, the ball of the foot must be placed on the base of the stirrup. The ball of the foot must be placed against the outside arm of the stirrup, making sure the stirrup is turned correctly. Then, the most important and for some, most difficult, the heels DOWN. This can’t be taken lightly. It is probably the singular most important thing you will ever learn, then master, in riding.
 
    Some of the points of correct position make for better riding, such as your own balance, better control of the horse or even a happier horse and rider.  But nothing equates safety like heels down.
 
     Heels down keeps you in the saddle.  A big problem with the aspect of heels down is not a bad attitude toward learning, but being physically able to do it.  Like all things learned, it takes practice.  Lots and lots of practice.
It does come easier to some than others.  Some people just don’t have a lot of flex in their ankles.  Either way, practice makes, well, better.  It’s only perfect if it works.
 
     When I would teach students, I had a few things they could do at home since they didn’t all have the luxury of practicing on a horse.  I would tell them to step up on say, a step of a stairway with their heels hanging over the edge and bounce, bounce, bounce.  Just flexing the ankles while sitting is another thing to do while not on the horse.
 
     To practice on a horse itself, the best way is to get into half-seat, or jumping position.  This forces more weight onto the foot since the weight is taken out of the saddle.  Then ride the horse at a walk, trot or canter, shoving the heels down as far as possible.  The best gait for this is actually the trot, without posting.  In the half seat, with each bounce of the trot steps, the student should push, push, push the heels down.  For students who only rode once a week, I would often spend part of the lesson on this exercise.
 
     So heels down.  Does it really save you?  Well, I can only speak from experience, but it has saved my butt a number of times whether on bucking horses, run-away horses or spinners.  I have been in situations that, when they started to get scary I would remind myself to get those heels down.
 
     I was training a young horse for a client who shouldn’t have bought a horse so green, but she had fallen in love and no one could dissuade her from buying him.  He wasn’t too bad and was coming along with lessons but it was time for him to canter.  I started working with him on my own and though fine on the lunge line, he threw three gigantic bucks under saddle. The heels down saved me, and it was close.  Not so good for the client. She tried the canter on the next lesson and he did the same three bucks to her. The third one sent her flying.  Luckily, no injuries.
 
     She had been a student for a few years, even before the first horse ownership and I couldn’t persuade her the importance of the heels down.  Constant reminders during lessons along with practice exercises, but she just couldn’t, or wouldn’t get them down. 
 
     So, I hope this little article has been helpful and will convince you whether you’re a novice taking a lesson, or a seasoned rider on a trail ride, hope your trails are happy and remember always, keep those heels down!

0 Comments

Watch Your Step

8/8/2022

1 Comment

 
Picture
1 Comment

August 08th, 2022

8/8/2022

0 Comments

 
Picture
0 Comments

It Ain't Hay

8/8/2022

2 Comments

 
Picture
2 Comments
<<Previous

    RSS Feed

Powered by Create your own unique website with customizable templates.